Huli Huli Chicken – Sweet, Smoky & Grilled to Perfection
I first had authentic huli huli chicken at a roadside stand in Maui about five years ago, and I’m not being dramatic when I say it was a life-altering experience. The sweet-savory glaze, that perfect char, the way the pineapple juice tenderizes the meat—it’s basically sunshine on a plate.

“Huli huli” means “turn turn” in Hawaiian, which refers to the constant flipping that creates that gorgeous, caramelized exterior. But here’s the thing—you don’t need to be a grill master or live in Hawaii to nail this recipe. I’ve been perfecting my mainland version for years, and honestly, it might be even better than what I had on vacation (don’t tell my Hawaiian friends I said that).
The secret is in that marinade. It’s got this perfect balance of sweet pineapple juice, soy sauce, ginger, and garlic that creates layers of flavor you just can’t get from regular BBQ sauce. Plus, it makes your whole backyard smell like a tropical paradise, which isn’t the worst thing that could happen to your evening.
Nutrition Information
Here’s the nutritional breakdown per serving (serves 6):
| Nutrient | Amount |
| Calories | 385 |
| Total Fat | 18g |
| Saturated Fat | 5g |
| Cholesterol | 145mg |
| Sodium | 950mg |
| Total Carbohydrates | 22g |
| Dietary Fiber | 0g |
| Sugars | 20g |
| Protein | 42g |
| Vitamin C | 25mg |
| Calcium | 45mg |
| Iron | 2.8mg |
| Potassium | 680mg |
Note: Nutritional values are approximate and may vary based on specific ingredients and chicken cuts used.
Why Huli Huli Chicken Is About to Become Your Signature Dish
Ever wonder why some grilled chicken is just… meh, while other chicken makes you want to lick the plate? It’s all about that marinade game, and huli huli chicken has mastered it. The pineapple juice acts as a natural tenderizer, breaking down those tough fibers while infusing tropical sweetness throughout the meat.
But here’s where it gets really good—the constant turning (that’s the huli huli part) creates this incredible caramelization. You’re not just cooking chicken; you’re building layers of flavor with each flip. The sugars in the marinade caramelize, the soy sauce adds that umami depth, and the ginger brings this subtle heat that ties everything together.
I’ve been making this recipe for family gatherings, backyard parties, and random Tuesday nights when I need something that feels special. My neighbors have literally started timing their evening walks to coincide with my grilling sessions because the smell is just that good. One guy actually asked if I was running a secret restaurant out of my backyard (tempting, but no).
The best part? It looks way more complicated than it actually is. People think you’re some kind of culinary genius, but really, you just marinated some chicken and flipped it a bunch of times.
Ingredients You’ll Need
For the Marinade:
- 1 cup pineapple juice (fresh is amazing, but canned works too)
- 1/2 cup soy sauce (low sodium preferred)
- 1/2 cup brown sugar, packed
- 1/4 cup ketchup
- 3 tablespoons rice vinegar
- 2 tablespoons vegetable oil
- 4 cloves fresh garlic, minced
- 2 tablespoons fresh ginger, grated
- 1 teaspoon sesame oil
- 1/2 teaspoon red pepper flakes (optional)**
For the Chicken:
- 3 lbs chicken pieces (thighs and drumsticks work best)
- Salt and black pepper for initial seasoning
For the Basting Sauce:
- 1 cup reserved marinade (set aside before adding raw chicken!)
- 2 tablespoons honey
- 1 tablespoon cornstarch mixed with 2 tablespoons water
For Serving:
- 2 green onions, sliced thin
- 1 tablespoon sesame seeds, toasted
- Fresh pineapple wedges
- Lime wedges
Step-by-Step Instructions
Creating the Perfect Marinade
Step 1: This is where the magic starts. Whisk together pineapple juice, soy sauce, brown sugar, ketchup, rice vinegar, vegetable oil, minced garlic, grated ginger, sesame oil, and red pepper flakes in a large bowl. Make sure that brown sugar dissolves completely—you don’t want gritty spots.
Step 2: Here’s a crucial step that most people skip: reserve 1 cup of this marinade in a separate container before you add any raw chicken. This becomes your basting sauce, and trust me, you don’t want to use marinade that’s been contaminated with raw chicken juices.
Step 3: Taste your marinade and adjust if needed. Too sweet? Add more soy sauce or vinegar. Too salty? A bit more brown sugar will balance it out. This should taste like something you’d want to drink (okay, maybe not literally, but you get the idea).
Prepping the Chicken Like a Pro
Step 4: Pat your chicken pieces completely dry and season them lightly with salt and pepper. This might seem redundant since we’re about to marinate them, but that initial seasoning helps the marinade penetrate better.
Step 5: Place the chicken in a large zip-top bag or shallow dish and pour the marinade over it. Make sure every piece is coated—massage it around if you need to. The chicken should be swimming in that golden goodness.
Step 6: Marinate for at least 4 hours, but overnight is even better. I usually start this in the morning for dinner that night. The longer it sits, the more those flavors penetrate the meat and the more tender everything becomes.
Preparing Your Basting Sauce
Step 7: Take that reserved marinade and pour it into a small saucepan. Add the honey and bring it to a boil over medium heat. This kills any potential bacteria and concentrates the flavors.
Step 8: Mix cornstarch with water to create a slurry, then whisk it into the boiling marinade. This will thicken it slightly so it clings better to the chicken during basting. Let it simmer for 2-3 minutes until it coats the back of a spoon.
Step 9: Set this aside to cool slightly. You want it warm for basting, not scorching hot.
The Grilling Process (Where the Magic Happens)
Step 10: Preheat your grill to medium heat—around 350-375°F. If you’re using charcoal, set up a two-zone fire with coals on one side for direct heat and an empty side for indirect cooking.
Step 11: Remove the chicken from the marinade and let excess drip off. Don’t pat it dry—you want some of that marinade clinging to create that first layer of caramelization.
Step 12: Start grilling skin-side down over direct heat for about 5-6 minutes. You want to hear that satisfying sizzle, but not violent spattering that means your heat is too high.
The Huli Huli Technique
Step 13: Here’s where the name comes from—flip (huli) that chicken and move it to indirect heat. Brush with your prepared basting sauce and cook for another 6-8 minutes.
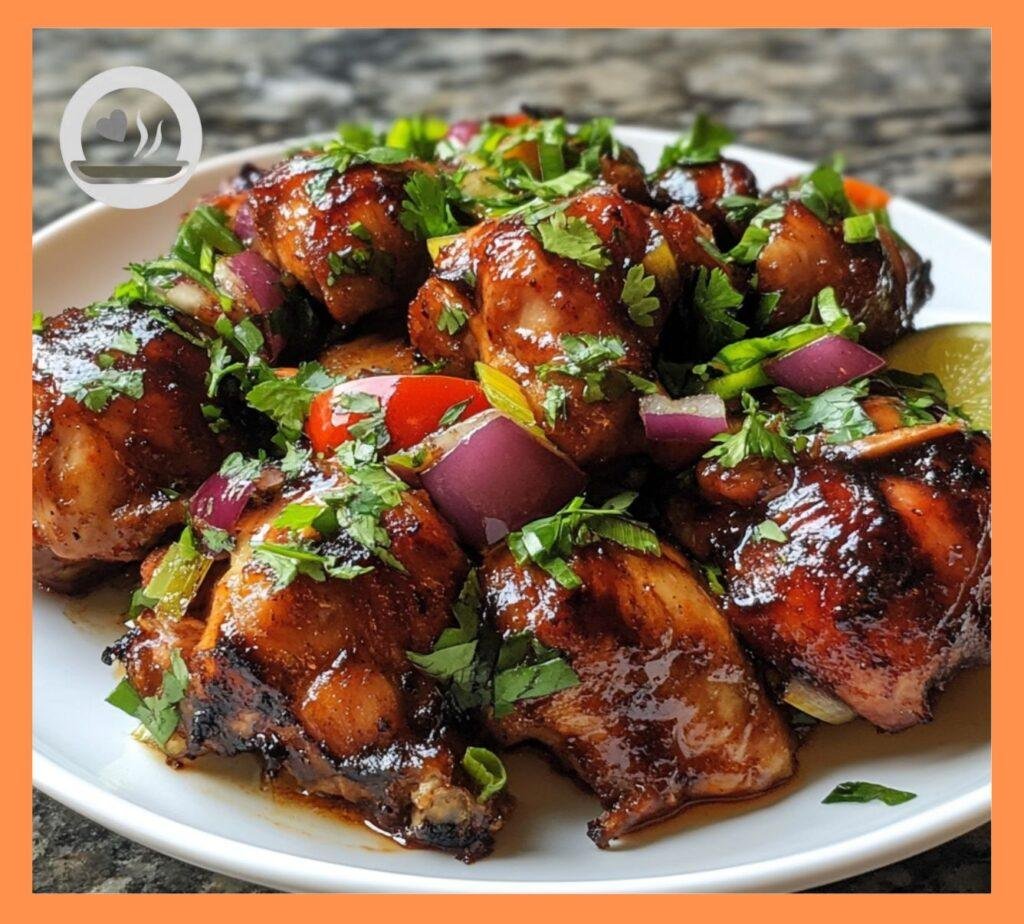
Step 14: Flip again, brush with more sauce, and continue this process every 6-8 minutes. You’ll flip the chicken about 4-5 times total, building up those beautiful caramelized layers with each turn.
Step 15: The chicken is done when it reaches an internal temperature of 165°F and the skin is gorgeously golden and slightly charred. This usually takes about 35-45 minutes total, depending on the size of your pieces.
Pro Tips for Huli Huli Perfection
Marinade Timing Matters
Four hours is the minimum, but 12-24 hours is the sweet spot. The pineapple juice will start breaking down the proteins, so don’t go much longer than 24 hours or your chicken might get mushy.
Temperature Control is Key
Medium heat is crucial here. Too hot and that sugar in the marinade will burn before the chicken cooks through. Too low and you won’t get that beautiful caramelization. Aim for that 350-375°F zone.
The Right Chicken Parts
Thighs and drumsticks are traditional and work best because they stay juicy and handle the longer cooking time. If you use breasts, consider butterflying them so they cook more evenly.
Basting Brush Strategy
Use a silicone brush for basting—it won’t burn like natural bristles, and it’s easier to clean. Keep your basting sauce warm in a small pot on the side of the grill.
Variations That’ll Keep Things Exciting
Spicy Island Style
Add more red pepper flakes to the marinade, or throw in some fresh jalapeños. Finish with a sprinkle of chili powder and lime juice for that perfect heat-sweet balance.
Teriyaki Fusion
Replace half the pineapple juice with orange juice and add a tablespoon of mirin to the marinade. It creates this incredible teriyaki-huli huli hybrid that’s absolutely addictive.
Coconut Twist
Add a couple tablespoons of coconut milk to the marinade and garnish with toasted coconut flakes. It’s like having a piña colada in chicken form.
Smoky BBQ Version
Add a teaspoon of smoked paprika and a tablespoon of liquid smoke to the marinade. If you’re using a charcoal grill, throw some soaked wood chips on the coals for extra smokiness.
Indoor Cooking Options
Oven Method
No grill? No problem. Preheat your oven to 425°F and line a baking sheet with foil. Bake the marinated chicken for 35-40 minutes, basting and flipping every 10 minutes. Turn on the broiler for the last 3-4 minutes to get that caramelized finish.
Cast Iron Pan
Heat a large cast-iron skillet over medium heat and sear the chicken pieces skin-side down first. Flip, add some of the basting sauce, and transfer the whole pan to a 375°F oven to finish cooking.
Side Dishes That Complete the Experience
This chicken pairs beautifully with:
- Coconut rice cooked with a bit of coconut milk
- Grilled pineapple with a sprinkle of cinnamon
- Simple coleslaw with a ginger-sesame dressing
- Sweet potato wedges roasted with a touch of brown sugar
- Steamed jasmine rice to soak up all those incredible pan juices
Storage and Reheating Tips
Make-Ahead Magic
You can marinate the chicken up to 2 days ahead, and honestly, it just gets better. The basting sauce can be made a week in advance and stored in the fridge—just reheat it gently before using.
Leftover Gold
These leftovers are incredible. Shred the meat and use it for tacos, rice bowls, or sandwiches. The flavors actually intensify overnight, making day-two chicken sometimes even better than the original.
Reheating Without Drying Out
Reheat gently in a 325°F oven, covered with foil, for about 15 minutes. Add a splash of the reserved marinade to keep things moist.
The Cultural Story Behind the Recipe
Huli huli chicken was created in the 1950s by Ernest Morgado, a Hawaiian entrepreneur who wanted to showcase local flavors at fundraising events. The name comes from the Hawaiian word “huli,” meaning to turn or flip, which describes the cooking technique.
What makes this recipe special isn’t just the flavors—it’s the community aspect. Traditional huli huli cooking involves large rotisserie-style grills where hundreds of chickens cook together, constantly being turned. It’s become synonymous with Hawaiian gatherings and celebrations.
Why This Recipe Works Every Time
The science here is pretty beautiful. The pineapple juice contains bromelain, an enzyme that breaks down proteins, naturally tenderizing the meat. The sugars caramelize during cooking, creating that gorgeous lacquered appearance. The soy sauce adds umami depth, while the ginger and garlic provide aromatic complexity.
The constant flipping ensures even cooking and prevents burning while building up those flavor layers. Each turn adds another coat of that delicious glaze, creating chicken that’s both sweet and savory with the perfect amount of char.
Equipment That Makes It Easier
You don’t need special equipment, but a few things help:
- A good instant-read thermometer to check doneness
- Long-handled tongs for easy flipping
- A silicone basting brush that won’t burn
- A small saucepan to keep basting sauce warm
Scaling for Crowds
This recipe doubles, triples, or quadruples easily. Just make sure you have enough grill space and don’t overcrowd—the chicken needs room to cook evenly. For large batches, consider setting up multiple grilling zones at different temperatures.
The Verdict on This Island Paradise Chicken
Look, I’ve tried a lot of chicken marinades over the years. Some are too sweet, some are too salty, and most just sit on the surface without really penetrating the meat. This huli huli marinade is different—it creates chicken that’s flavorful all the way through, not just on the outside.
The combination of sweet pineapple, salty soy sauce, warming ginger, and that gorgeous caramelization from constant turning creates something that’s both familiar and exotic. It’s comfort food with a passport, the kind of dish that makes every meal feel like a celebration.
Whether you’re hosting your first backyard BBQ or you’re a grilling veteran looking for something new, this huli huli chicken delivers every single time. The technique is simple, the ingredients are accessible, and the results are consistently spectacular.
Plus, let’s be honest—there’s something pretty satisfying about telling people you made “authentic Hawaiian huli huli chicken” when they compliment your grilling skills. Just don’t mention how easy it actually was 🙂 Trust me, once you master this tropical masterpiece, it’ll become your go-to answer for “what should we grill tonight?” And honestly, that’s a pretty great problem to solve.