Fried Strawberry Cheesecake Sandwiches – Insanely Delicious!
Remember when you were a kid and you thought deep-frying everything was the ultimate life hack? Well, turns out little you was onto something genius. These fried strawberry cheesecake sandwiches are basically what happens when your childhood dreams meet adult-level execution, and honestly, I’m not even sorry about the calories.
I created this recipe during a particularly wild weekend when I had leftover cheesecake filling, fresh strawberries going soft, and a sudden craving for something completely over-the-top. What started as a “let’s see what happens” experiment turned into the dessert that made my friends start showing up unannounced with hopeful expressions. Can you blame them?
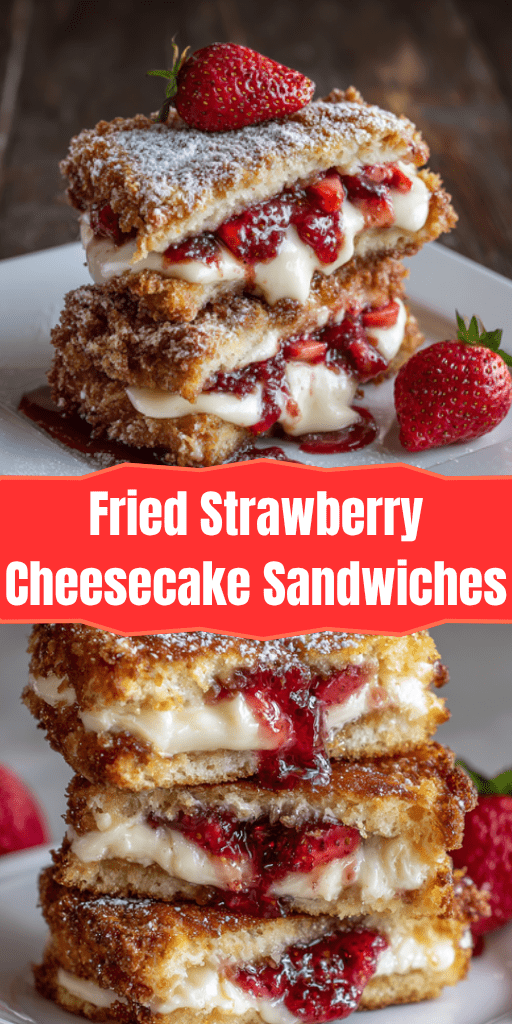
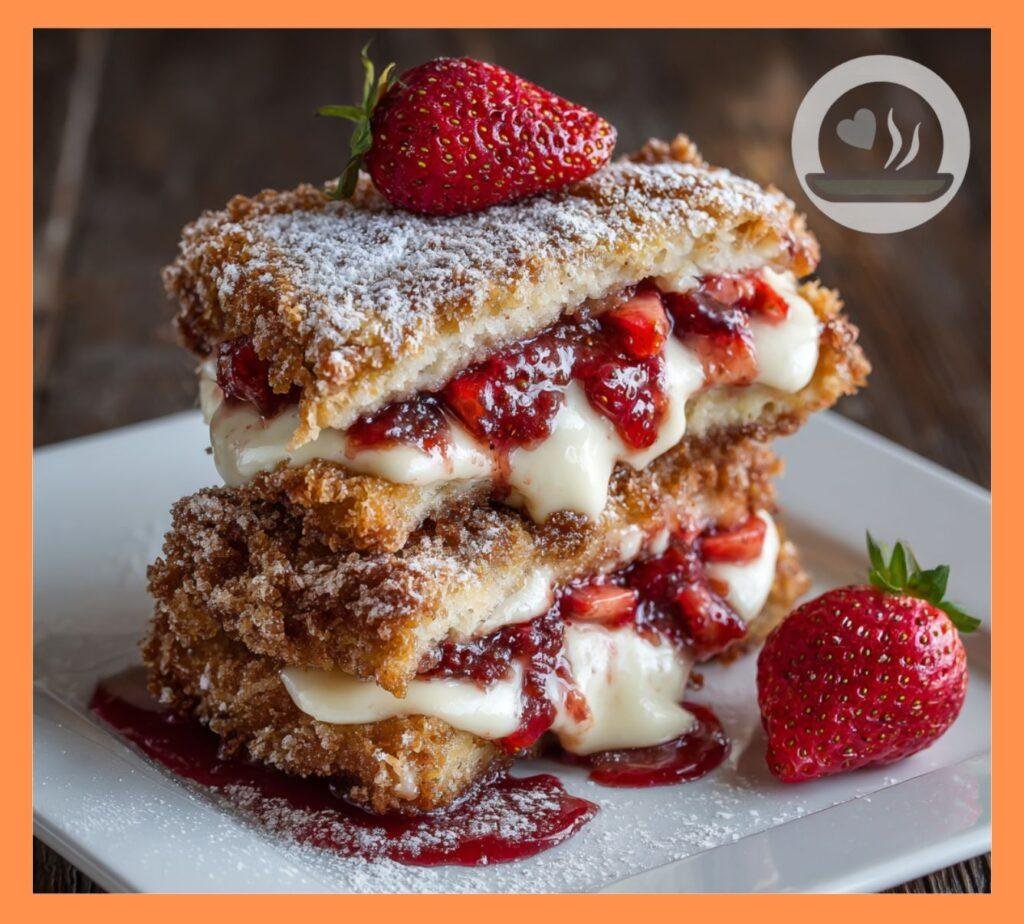
Picture this: crispy, golden-brown exterior that gives way to warm, creamy cheesecake filling studded with sweet, jammy strawberries. It’s like a state fair and a fancy dessert restaurant had a beautiful, indulgent baby. And the best part? You can make these at home without needing a food truck license or questionable life choices.
Nutrition Information
| Nutrient | Per Sandwich (Makes 6) |
| Calories | 520 |
| Protein | 8g |
| Carbohydrates | 45g |
| Fat | 35g |
| Saturated Fat | 18g |
| Fiber | 3g |
| Sodium | 380mg |
| Sugar | 28g |
| Calcium | 125mg |
| Iron | 2.1mg |
Note: Nutritional values are approximate and may vary based on specific ingredients used. Also, let’s be real – you’re not eating this for the nutrition 🙂
What Makes These Sandwiches Absolutely Addictive?
Here’s why these work so incredibly well: the hot, crispy exterior creates this amazing textural contrast with the cool, creamy filling inside. The strawberries get slightly jammy from the heat, creating these little pockets of concentrated sweetness that burst in your mouth. Meanwhile, the cheesecake filling stays perfectly creamy and tangy, balancing out all that fried goodness.
The secret is in the temperature control and the coating technique. Get your oil too hot and you’ll have burnt outsides with cold centers. Too cool and you’ll end up with greasy, soggy disasters. But nail that sweet spot? Pure magic happens.
Ingredients You’ll Need
For the Cheesecake Filling:
- 8 oz cream cheese, room temperature (this is crucial!)
- ½ cup powdered sugar
- 1 teaspoon vanilla extract
- ¼ teaspoon lemon zest
- 2 tablespoons heavy cream
- Pinch of salt
For the Strawberry Component:
- 1½ cups fresh strawberries, hulled and diced small
- 3 tablespoons granulated sugar
- 1 tablespoon cornstarch
- 1 teaspoon lemon juice
- ¼ teaspoon vanilla extract
For Assembly:
- 12 slices thick brioche bread (or challah – trust me on this)
- 2 cups all-purpose flour
- 3 large eggs
- ¼ cup whole milk
- 2 cups panko breadcrumbs
- 1 cup regular breadcrumbs
- Vegetable oil for frying (about 6 cups)
For Garnish:
- Powdered sugar for dusting
- Fresh strawberry slices
- Whipped cream
- Strawberry sauce (optional but recommended)
Step-by-Step Instructions
Making the Perfect Cheesecake Filling
Step 1: Make sure your cream cheese is truly at room temperature – this prevents lumps and ensures silky smoothness. If you forgot to take it out early, cut it into small cubes and let it sit for 30 minutes.
Step 2: In a large bowl, beat the cream cheese with an electric mixer until completely smooth and fluffy, about 3 minutes. Scrape down the sides frequently – those little chunks will ruin your texture.
Step 3: Gradually add the powdered sugar, beating until well combined. Add the vanilla, lemon zest, heavy cream, and salt. Beat until the mixture is light, fluffy, and holds its shape when lifted with the beaters.
Step 4: Transfer to a piping bag or zip-top bag with the corner cut off. This makes assembly so much easier, and your future self will thank you.
Creating the Strawberry Magic
Step 5: In a medium saucepan, combine the diced strawberries, granulated sugar, cornstarch, lemon juice, and vanilla. Cook over medium heat, stirring frequently, until the strawberries break down and the mixture thickens, about 8-10 minutes.
Step 6: The mixture should coat the back of a spoon and hold together without being runny. If it’s too thick, add a tablespoon of water. Too thin? Cook it down a bit more.
Step 7: Remove from heat and let cool completely. This step is important – hot strawberry filling will melt your cheesecake mixture and create a mess.
Assembly Time (This is Where It Gets Fun)
Step 8: Lay out your brioche slices and pipe or spread about 3 tablespoons of cheesecake filling on 6 slices, leaving a ½-inch border around the edges.
Step 9: Spoon about 2 tablespoons of the cooled strawberry mixture over the cheesecake filling, staying within that border. The filling will spread when you press the sandwich together.
Step 10: Top with the remaining bread slices and press gently around the edges to seal. Use a fork to crimp the edges if you want extra security – these sandwiches are precious cargo!
Setting Up Your Breading Station
Step 11: Set up three shallow dishes: flour in the first, beaten eggs mixed with milk in the second, and combined panko and regular breadcrumbs in the third. The double breadcrumb action creates that perfect texture we’re after.
Step 12: Working with one sandwich at a time, dredge in flour, shaking off excess. Dip in egg wash, letting excess drip off. Finally, coat generously in the breadcrumb mixture, pressing gently to help it adhere.
Step 13: Place breaded sandwiches on a baking sheet and refrigerate for at least 30 minutes. This chilling step helps everything stay together during frying.
The Frying Magic (Don’t Skip the Thermometer!)
Step 14: Heat vegetable oil in a large, heavy pot to 350°F (175°C). Use a candy thermometer – guessing oil temperature is a recipe for disaster, and we’ve come too far to mess up now.
Step 15: Fry sandwiches one or two at a time, depending on your pot size. Don’t overcrowd! Fry for 2-3 minutes per side until golden brown and crispy.
Step 16: Remove with a slotted spoon and drain on paper towels for about 1 minute. Serve immediately while the contrast between hot exterior and cool interior is at its peak.
Pro Tips That’ll Make You Look Like a Frying Genius
Bread Selection Matters
Brioche or challah are non-negotiable here. Regular sandwich bread will fall apart, and you’ll be left crying into your oil. The egg-enriched bread holds up to the moisture and frying process beautifully.
Oil Temperature is Everything
Keep that thermometer handy! If your oil drops below 325°F, your sandwiches will absorb too much oil and become greasy. Above 375°F and they’ll burn before the inside warms through. 350°F is your sweet spot.
The Chilling Trick
That 30-minute refrigeration isn’t optional – it’s what keeps your sandwiches from exploding in the oil. The cold filling firms up, and the breading adheres better. Patience, grasshopper.
Serving Strategy
These are best served immediately while the temperature contrast is dramatic. If you need to hold them briefly, keep them in a 200°F oven for up to 10 minutes, but honestly, they’re never better than right out of the oil.
Variations That’ll Keep Your Taste Buds Guessing
Chocolate Strawberry Version
Add 2 tablespoons of cocoa powder to your cheesecake filling for a chocolate twist. The combination with strawberries is absolutely divine – like chocolate-covered strawberries in sandwich form.
Berry Medley Madness
Mix strawberries with raspberries and blueberries for a triple-berry explosion. Adjust the sugar based on the tartness of your berries.
Caramel Apple Variation
Replace strawberries with sautéed cinnamon apples and add a drizzle of caramel to the cheesecake filling. It’s like apple pie and cheesecake had a fried baby – in the best way possible.
Mini Bite-Sized Version
Use slider buns or cut regular bread into circles with a large cookie cutter. Reduce frying time to 1-2 minutes per side. These make fantastic party appetizers that’ll have people talking for weeks.
Safety Tips (Because Hot Oil is Serious Business)
Equipment Essentials
Use a heavy, deep pot with high sides to prevent splattering. Keep a lid nearby in case of flare-ups, and never leave hot oil unattended. Have a fire extinguisher handy – better safe than sorry.
Temperature Monitoring
That candy thermometer isn’t just a suggestion – it’s your best friend. Oil that’s too hot can cause dangerous splattering and will definitely ruin your sandwiches.
Disposal Done Right
Let the oil cool completely before disposing. Strain it through cheesecloth if you want to reuse it once, but fresh oil always gives better results.
Storage and Reheating (Though They Rarely Last Long)
These sandwiches are absolutely best served fresh and hot. However, if you have leftovers (lucky you!), store them in the refrigerator for up to 2 days. Reheat in a 350°F oven for 8-10 minutes to re-crisp the exterior.
Pro tip: You can make the filling components ahead of time and store them separately in the fridge for up to 3 days. Just assemble and fry when you’re ready to serve.
Why This Recipe Works So Incredibly Well
The magic happens in the contrast of temperatures and textures. That hot, crunchy exterior gives way to cool, creamy filling that’s studded with sweet, slightly warm strawberries. It’s like getting three different desserts in every bite.
The tangy cheesecake filling balances the sweetness of the strawberries and prevents the whole thing from being cloyingly sweet. Meanwhile, the crispy coating provides textural interest and that satisfying crunch that makes fried foods so addictive.
Perfect Occasions for These Show-Stoppers
These sandwiches are perfect for summer gatherings, birthday parties, or any time you want to completely blow people’s minds. They’re fancy enough for special occasions but fun enough for casual get-togethers.
Fair warning: people will remember these. I’ve had friends text me months later asking when I’m making them again. It’s both flattering and slightly terrifying – the power of really good fried desserts, I guess!
Serving Suggestions That’ll Complete the Experience
Dust these beauties with powdered sugar and serve with fresh strawberry slices and a dollop of whipped cream. If you’re feeling extra fancy, drizzle some strawberry sauce around the plate. A scoop of vanilla ice cream on the side doesn’t hurt either – the temperature contrast is absolutely divine.
For drinks, these pair beautifully with cold milk, iced coffee, or even a glass of dessert wine if you’re going full fancy-pants mode.
Final Thoughts
Look, I’m not going to pretend these are health food. They’re pure indulgence, and that’s exactly the point. Sometimes you need a dessert that makes people stop what they’re doing and pay attention. These fried strawberry cheesecake sandwiches do exactly that – they’re conversation starters, memory makers, and quite possibly the most extra dessert you’ll ever serve.
The combination of creamy cheesecake, sweet strawberries, and that incredible crispy coating creates something that’s way more than the sum of its parts. It’s comfort food meets gourmet dessert meets state fair nostalgia, all wrapped up in one gloriously indulgent package.
So fire up that oil, gather your ingredients, and get ready to create something that’ll have people talking for months. Your kitchen is about to become the most popular destination in the neighborhood, and honestly, you should probably prepare yourself for some very persistent recipe requests.
Just don’t blame me when you start dreaming about these sandwiches – it’s a perfectly normal side effect of making something this incredible! 😊