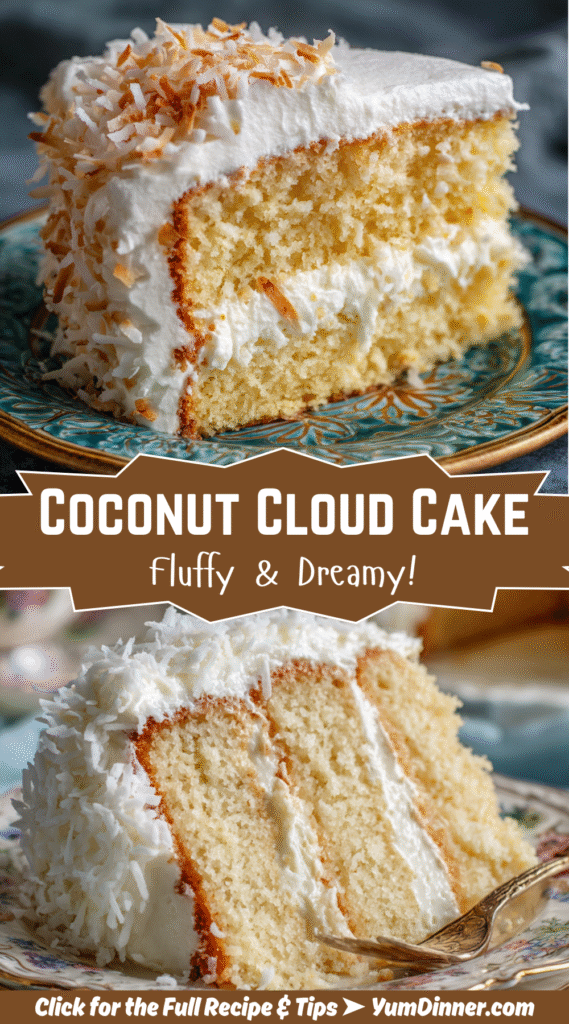
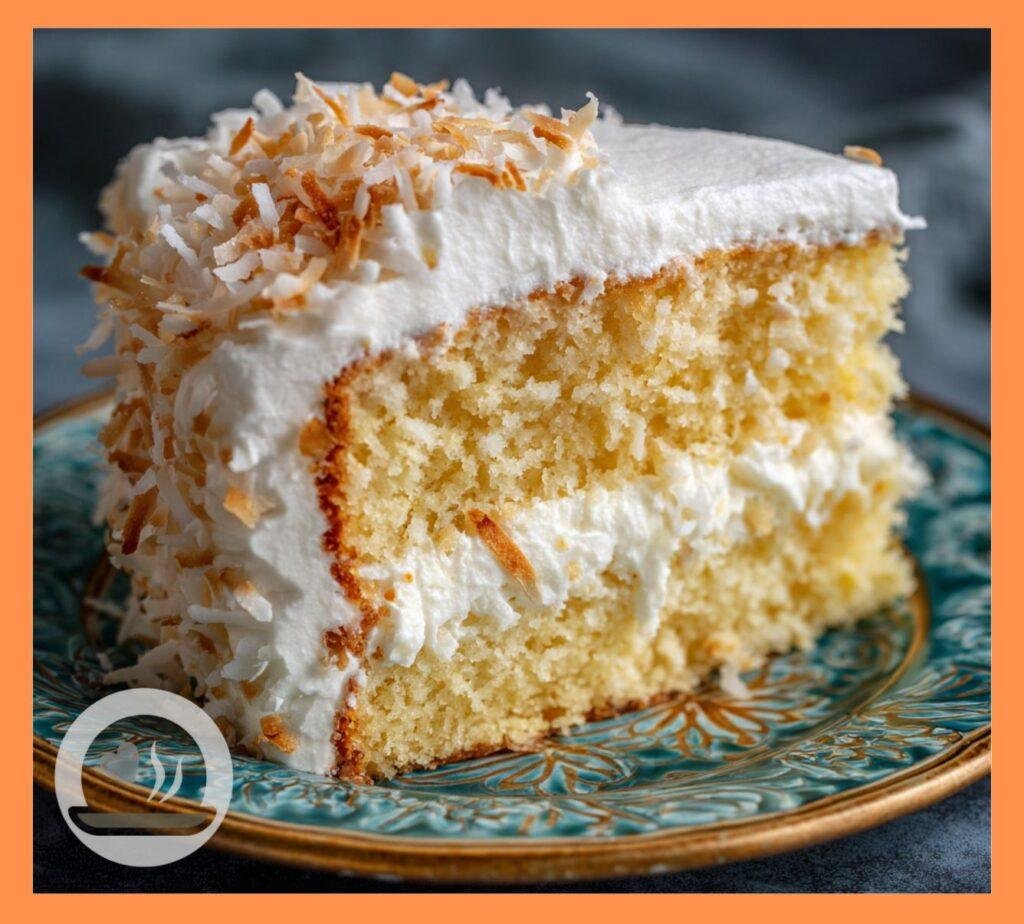
Coconut Cloud Cake – Light, Fluffy & Dreamy!
Picture this: you take a bite of cake so light and airy that it practically dissolves on your tongue, leaving behind nothing but pure coconut bliss and the faint memory of what heaven might taste like. That’s exactly what you’re getting with this Coconut Cloud Cake – a dessert so ethereal, it makes regular cake look like dense, sad cardboard in comparison.
I first discovered the magic of this recipe during a particularly stressful week when I needed something that felt like a warm hug from a tropical island. After three attempts at perfecting the technique (and yes, there were some spectacular failures involving deflated dreams and kitchen tears), I finally cracked the code. The secret lies in the whipped egg whites and the perfect balance of coconut milk, shredded coconut, and just enough structure to keep this cloud from floating away entirely.
Trust me when I say this cake will become your go-to dessert for impressing people without actually breaking your back in the kitchen. It’s fancy enough for dinner parties but simple enough for a random Tuesday when you need something sweet to make life feel less chaotic.
Nutritional Information (Per Serving – Makes 12 servings)
| Nutrient | Amount | % Daily Value |
| Calories | 320 | 16% |
| Total Fat | 18g | 23% |
| Saturated Fat | 15g | 75% |
| Cholesterol | 95mg | 32% |
| Sodium | 180mg | 8% |
| Total Carbs | 38g | 14% |
| Dietary Fiber | 2g | 7% |
| Sugars | 28g | – |
| Protein | 5g | 10% |
| Vitamin C | 2mg | 2% |
| Calcium | 80mg | 6% |
| Iron | 1.1mg | 6% |
Why This Cake Will Ruin All Other Cakes for You
Here’s the thing about most coconut cakes – they’re either dry as the Sahara desert or so heavy they could double as a doorstop. This recipe throws all those problems out the window and delivers something completely different: a cloud-like texture that’s moist without being dense, and coconut flavor that’s pronounced but not overwhelming.
The magic happens through a combination of whipped egg whites folded into the batter and the use of both coconut milk and cream of coconut. The result? A cake that literally melts in your mouth while delivering waves of tropical flavor that transport you straight to a hammock on a beach somewhere.
Ever wondered why some cakes just taste better than others? It’s all about technique, and this recipe teaches you the art of creating air pockets that stay put while baking.
Ingredients That Create Pure Magic
For the Cake:
- 2 1/4 cups all-purpose flour
- 1 1/2 cups granulated sugar
- 1/2 cup unsalted butter, softened
- 3/4 cup canned coconut milk (full-fat, not light)
- 1/4 cup cream of coconut (like Coco López)
- 4 large eggs, separated
- 2 teaspoons vanilla extract
- 1 teaspoon coconut extract
- 2 teaspoons baking powder
- 1/2 teaspoon salt
- 3/4 cup sweetened shredded coconut
For the Coconut Whipped Cream Frosting:
- 1 1/2 cups heavy whipping cream
- 1/3 cup powdered sugar
- 1/4 cup cream of coconut
- 1 teaspoon vanilla extract
- 1/2 teaspoon coconut extract
For the Finishing Touch:
- 1 1/2 cups sweetened shredded coconut, toasted
- Fresh berries (optional, but they make it look fancy)
Step-by-Step Instructions (Don’t Skip Any Steps – Seriously!)
Step 1: Prep Like Your Life Depends on It
Preheat your oven to 350°F and grease two 9-inch round cake pans. Line the bottoms with parchment paper because nothing ruins a perfect cake like it sticking to the pan. Trust me on this one – I’ve learned the hard way.
Pro tip: Toast your finishing coconut while the oven preheats. Spread it on a baking sheet and toast for 3-5 minutes until golden. Keep an eye on it because coconut goes from perfect to burnt faster than you can say “tropical paradise.”
Step 2: Create Your Dry Foundation
In a medium bowl, whisk together flour, baking powder, and salt. Set this aside because we’ll need it later, and having everything ready makes the whole process flow like a well-choreographed dance.
Here’s where most people mess up: they dump everything together at once. Don’t be that person. Baking is chemistry, and chemistry requires precision.
Step 3: Cream and Dream
In a large bowl, cream the softened butter with granulated sugar until light and fluffy – we’re talking 3-4 minutes of serious beating here. The mixture should look pale and almost double in volume.
Add the egg yolks one at a time, beating well after each addition. Then mix in both extracts, coconut milk, and cream of coconut. The batter might look a little weird at this point, but that’s totally normal. We’re building flavor layers here.
Step 4: The Gentle Fold (This Is Where Magic Happens)
Gradually add the flour mixture to the wet ingredients, mixing just until combined. Fold in the 3/4 cup of shredded coconut gently – we want to distribute it evenly without overworking the batter.
Now comes the crucial part: in a separate, completely clean bowl, whip those egg whites until they form soft peaks. This usually takes 2-3 minutes with an electric mixer. Clean bowl = successful peaks. Any trace of fat or yolk will prevent proper whipping, and then we’re all sad.
Step 5: The Art of Folding (Don’t Deflate Your Dreams)
Here’s where technique becomes everything. Add about 1/3 of the whipped egg whites to your cake batter and fold gently with a rubber spatula. Use a cutting and folding motion – cut down through the center, sweep across the bottom, and fold up and over.
Add the remaining egg whites in two more additions, folding just until no white streaks remain. The batter should look light and airy, almost like it’s already trying to float away.
Step 6: Bake Until Golden Dreams Come True
Divide the batter evenly between your prepared pans and gently level the tops. Bake for 25-30 minutes until the tops are golden and a toothpick inserted in the center comes out clean or with just a few moist crumbs.
Don’t open the oven door for the first 20 minutes – I know it’s tempting, but sudden temperature changes can cause your beautiful cloud to collapse. Patience is a virtue, especially in baking.
Step 7: Cool Like a Professional
Let the cakes cool in the pans for 10 minutes, then turn them out onto wire racks to cool completely. This step is non-negotiable – frosting a warm cake is like trying to put makeup on in a sauna. It’s not going to end well.
Step 8: Whip Up That Heavenly Frosting
While your cakes cool, make the frosting. Whip the heavy cream, powdered sugar, cream of coconut, and both extracts until soft peaks form. Don’t overwhip or you’ll end up with coconut butter instead of fluffy frosting.
The consistency should be spreadable but still light and airy. If it gets too stiff, gently fold in a tablespoon of coconut milk to loosen it up.
Assembly That’ll Make You Feel Like a Cake Boss
Place one cake layer on your serving plate and spread about 1/3 of the frosting evenly over the top. Add the second layer and frost the top and sides with the remaining frosting.
Now for the fun part – press that gorgeous toasted coconut all over the outside of the cake. I like to do this over a large piece of parchment paper to catch the falling coconut (waste not, want not!).
Styling tip: If you’re feeling fancy, arrange some fresh berries on top. Strawberries and raspberries look stunning against all that white coconut, and they add a pop of color that screams “I know what I’m doing in the kitchen.”
Why This Recipe Works Every Single Time
The success of this cake lies in understanding that air is an ingredient. Those whipped egg whites aren’t just for show – they create the light, cloud-like texture that makes this cake special. The combination of coconut milk and cream of coconut delivers intense coconut flavor without making the cake heavy.
The toasted coconut on the outside isn’t just decoration either. It adds textural contrast and intensifies the coconut flavor while giving you those Instagram-worthy looks that make people think you’re some kind of baking wizard.
Pro Tips That Separate Good Bakers from Great Ones
Room temperature ingredients are your friend: Cold eggs and butter don’t play well together. Pull everything out about an hour before you start baking.
Don’t skip the cream of coconut: It’s different from coconut milk and adds richness and sweetness that regular coconut milk can’t match. Look for it in the cocktail mixer section if you can’t find it with the baking supplies.
Fold, don’t stir: When incorporating those precious egg whites, gentle folding motions preserve the air bubbles that make this cake cloud-like. Aggressive stirring deflates everything faster than a punctured balloon.
Toast your own coconut: Store-bought toasted coconut is fine, but freshly toasted tastes infinitely better and takes literally five minutes. Your taste buds will thank you.
Variations That Keep Things Interesting
Want to shake things up? Try adding lime zest to the batter for a coconut-lime vibe that screams tropical vacation. A tablespoon of zest in the cake and a teaspoon in the frosting transforms this into something completely different.
For chocolate lovers (because apparently they exist even in coconut paradise), try chocolate shavings mixed with the toasted coconut for the exterior coating. It sounds weird, but trust me – coconut and chocolate are basically soulmates.
Rum extract instead of vanilla extract turns this into a piña colada cake situation that’s absolutely divine. Just don’t tell your kids what makes it taste so good 🙂
Storage and Serving Wisdom
This cake keeps beautifully in the refrigerator for up to 4 days, covered loosely with plastic wrap. The texture actually improves after a day as all the flavors meld together into coconut perfection.
Let it sit at room temperature for about 30 minutes before serving – cold cake is fine, but room temperature cake is transcendent. The frosting softens slightly, and all the flavors come alive.
Serving size reality check: The nutrition info says 12 servings, but honestly? This cake is so rich and satisfying that smaller slices work perfectly. Don’t feel bad about cutting smaller pieces – it just means the cake lasts longer!
Troubleshooting for When Things Go Sideways
Cake didn’t rise properly? Check your baking powder freshness and make sure you didn’t overmix after adding the flour. Also, those egg whites need to be properly whipped and gently folded.
Frosting too runny? Chill it for 15 minutes and try again. Sometimes cream needs a little encouragement to cooperate.
Coconut falling off the sides? Press it on gently but firmly right after frosting, while the frosting is still tacky. Waiting too long creates a slippery situation that ends with coconut on your floor instead of your cake.
The Final Verdict on This Slice of Heaven
This Coconut Cloud Cake isn’t just dessert – it’s an experience. It’s the kind of cake that makes people close their eyes on the first bite and go completely silent while they process what just happened in their mouth.
The light, airy texture combined with that intense coconut flavor creates something that feels both indulgent and refreshing at the same time. It’s fancy enough to serve at your most important dinner parties but simple enough that you won’t stress yourself into a kitchen meltdown making it.
IMO, this is the cake that’ll make you famous in your friend group. You know how some people become known for their chocolate chip cookies or their killer lasagna? This is your signature dessert waiting to happen.
So next time you want to transport yourself (and everyone around you) to a tropical paradise without leaving your kitchen, give this recipe a try. Your taste buds will book a permanent vacation, and you’ll finally understand why clouds are associated with heaven. Because honestly, after one bite of this cake, you’ll be floating right up there with them.