Cheeseburger Meatloaf Recipe You NEED to Try!
Love cheeseburgers but want something cozier, homier, and baked instead of grilled? Meet your new dinner obsession: Cheeseburger Meatloaf. It’s got all the cheesy, meaty goodness of your favorite burger, minus the soggy buns and with a crispy, golden crust to boot. Bonus? It slices beautifully, feeds a crowd, and reheats like a dream.
Perfect Pairing
Complete the burger vibes with:
- Crispy fries or tater tots – obviously
- Dill pickles or slaw – for that acid pop
- Ketchup or burger sauce – because meatloaf + sauce = meant to be
Drink Pairings:
- Milkshake : A classic pairing for a cheeseburger-inspired dish.
- Iced Tea : Refreshing and light to balance the richness.
Occasions to Serve
- Weeknight dinners – Comfort food with minimal babysitting
- Game day spreads – Slice it up like meatloaf sliders
- Family gatherings – Everyone loves a good “twist on a classic”
Recipe Overview
- Servings: 6
- Prep Time: 15 minutes
- Cook Time: 55 minutes
- Total Time: 1 hour 10 minutes
- Calories: ~430 per slice
Nutritional Information (Per Serving)
- Calories: 430
- Carbs: 11g
- Fat: 28g
- Protein: 34g
- Sugar: 4g
The Secrets of a Perfect Meatloaf
One of the secrets to nailing Cheeseburger Meatloaf lies in mastering the balance between juicy meat, gooey cheese, and bold flavors. Here’s how to do it:
1. Choosing the Right Ground Beef
The fat content in your ground beef is crucial for a juicy meatloaf. An 80/20 blend (80% lean, 20% fat) ensures the loaf stays moist and flavorful. Leaner blends can result in a dry texture, while fattier blends may cause excessive grease. For a leaner option, consider mixing ground turkey or chicken with beef for balanced flavor and moisture.
2. Handling the Meat Mixture Gently
Overmixing the meatloaf mixture can lead to a dense, tough texture. Use your hands or a spatula to combine the ingredients just until they come together. Think of it like folding batter—stop as soon as everything is evenly distributed. This technique keeps the meatloaf tender and light.
3. Creating the Cheese Pocket
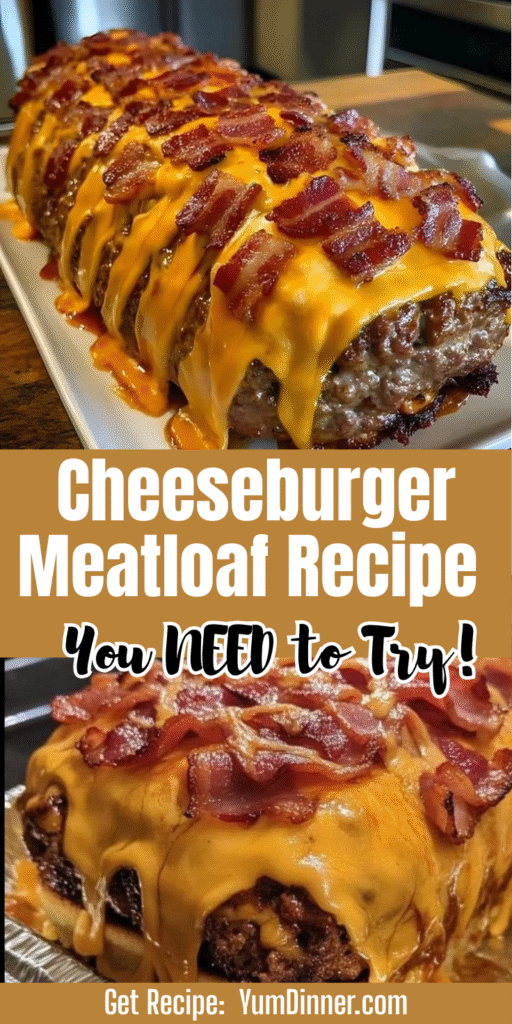
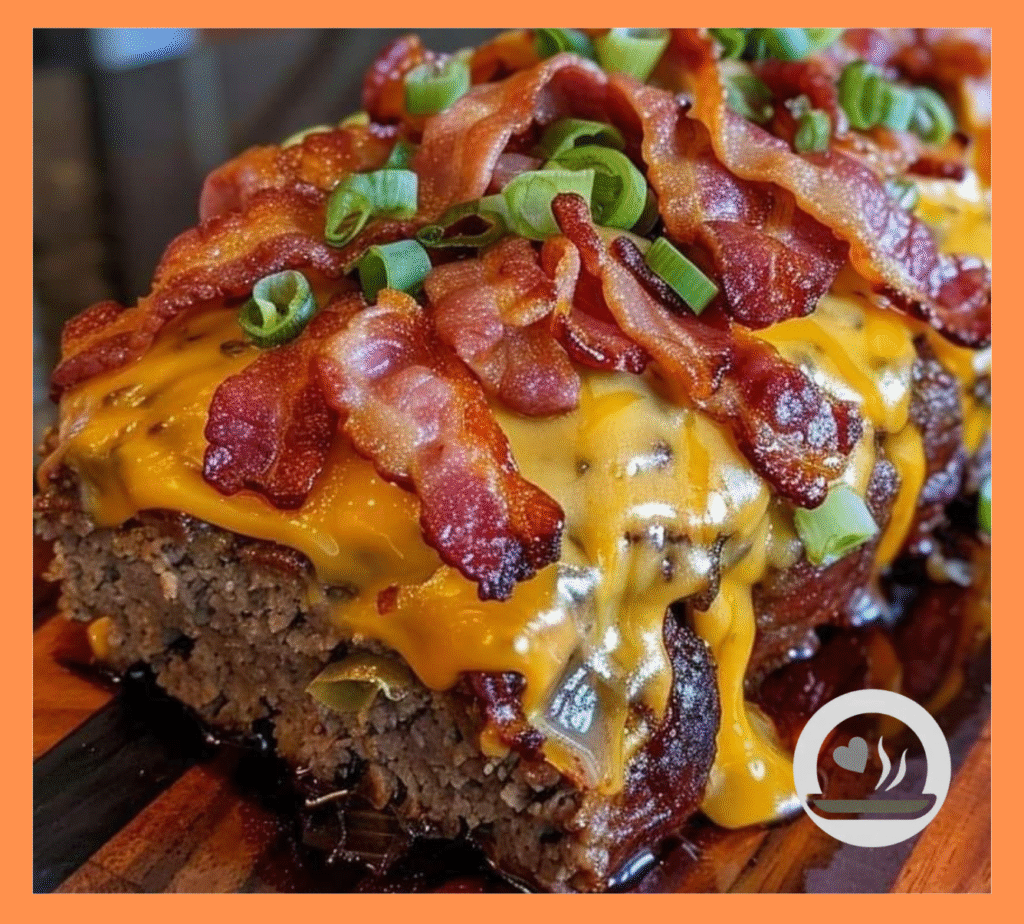
The surprise layer of melted cheese inside the meatloaf is what makes this dish special. To prevent the cheese from leaking out, press the meat mixture firmly around the edges when sealing the trench. A thin, even layer of cheese works best—it melts evenly without overwhelming the loaf.
4. Glazing for Flavor and Presentation
The ketchup-mustard glaze not only adds tangy sweetness but also creates a beautiful caramelized crust on the meatloaf. Apply half the glaze halfway through baking to allow the flavors to meld, then add the remaining glaze during the last 15 minutes of cooking. This two-step process prevents burning and ensures a glossy finish.
5. Resting the Meatloaf
After baking, let the meatloaf rest for 10 minutes before slicing. This allows the juices to redistribute, ensuring each slice is moist and flavorful. Skipping this step can result in dry slices and uneven texture.
6. Customizing Toppings and Sides
The beauty of this dish lies in its versatility. Pair it with classic burger toppings like pickles, red onions, and fresh parsley for a playful twist. Serve it with fries or mashed potatoes for a complete comfort food experience. Experiment with different cheeses—pepper jack for heat, mozzarella for stretchiness, or blue cheese for boldness.
By mastering these techniques, you’ll not only create mouthwatering Cheeseburger Meatloaf but also develop skills that can be applied to other dishes. Whether you’re shaping meatloaf, layering cheese, or balancing flavors, these principles will help you become a more confident and creative cook.
Ingredients List
For the Meatloaf:
- 1½ lbs ground beef (80/20 is perfect)
- 1 cup shredded cheddar cheese
- ½ cup breadcrumbs
- 1 large egg
- ⅓ cup ketchup
- 2 tablespoons yellow mustard
- 1 tablespoon Worcestershire sauce
- ½ small onion, finely chopped
- 1 garlic clove, minced
- 1 teaspoon salt
- ½ teaspoon black pepper
For the Topping:
- ¼ cup ketchup
- 1 tablespoon yellow mustard
- ¼ cup shredded cheddar (sprinkle on top last 10 min)
Step-by-Step Instructions
1. Preheat and prep
Preheat oven to 375°F (190°C). Line a loaf pan with parchment or foil, or use a baking sheet if you want extra crispy edges.
2. Mix the meat
In a large bowl, combine ground beef, cheddar, breadcrumbs, egg, ketchup, mustard, Worcestershire, onion, garlic, salt, and pepper. Mix just until combined—don’t mash it to death.
3. Shape and bake
Form into a loaf in your pan or on your sheet. Bake for 40 minutes.
4. Add the topping
Mix the ketchup and mustard for the topping. Spread over the top of the loaf. Sprinkle on cheddar. Return to the oven and bake another 10–15 minutes, until internal temp hits 160°F.
5. Rest, slice, devour
Let it rest 10 minutes before slicing. This is non-negotiable unless you like a meatloaf lava flow.
Tips for a Successful Dish
- Don’t overmix your meat or it’ll get dense.
- Shred your own cheese for maximum melt (pre-shred has anti-caking agents).
- Rest time matters—juices need to redistribute.
Troubleshooting Common Issues
Falling apart when sliced?
Could be too little binder (egg/breadcrumbs) or you sliced it hot. Chill, then rewarm slices if needed.
Greasy meatloaf?
Try a rack over a sheet pan or drain halfway through baking if needed.
Dry texture?
Overbaking or lean beef. Stick with 80/20 for best results.
Reader Favorites
“Made this for dinner, and my family loved it! The cheese inside was such a fun surprise.”
– Emily S.
“The ketchup-mustard glaze is genius—it tastes just like a cheeseburger!”
– Tom L.
“Perfect for meal prep! I sliced it and froze portions for quick lunches.”
– Rachel K.
FAQ
Can I use ground turkey instead of beef?
Yes, but add a little olive oil or extra cheese to compensate for dryness.
Can I prep this ahead?
Totally. Form and refrigerate up to 24 hours ahead. Add 5 extra minutes to baking time.
Freezer-friendly?
Absolutely. Freeze cooked slices or the whole loaf, tightly wrapped. Thaw overnight, reheat at 350°F.
The Story Behind Cheeseburger Meatloaf – A Comfort Food Mashup
The Magic of Fusion
Few dishes evoke nostalgia quite like a cheeseburger or meatloaf. Both are staples of American comfort food, bringing warmth and satisfaction to the table. But what happens when you combine them? Enter Cheeseburger Meatloaf , a playful mashup that captures the best of both worlds.
A Modern Classic
Meatloaf has been a family favorite for generations, while cheeseburgers have become a cultural icon. By stuffing a meatloaf with melty cheese and topping it with a tangy ketchup-mustard glaze, this dish bridges the gap between tradition and innovation. It’s a celebration of bold flavors, hearty textures, and the joy of reinvention.
Why This Meatloaf Rocks
This dish continues to captivate us because it’s familiar yet exciting. Whether served with fries, mashed potatoes, or a side salad, Cheeseburger Meatloaf offers endless possibilities while remaining deeply satisfying.
So the next time you dig into this Cheeseburger Meatloaf , take a moment to appreciate its ingenuity. From humble ingredients to bold flavors, this dish truly is a testament to the power of creativity.
Conclusion
If cheeseburgers and meatloaf had a delicious little love child, this would be it. This Cheeseburger Meatloaf hits every comfort note without the hassle of a grill. Cheesy, meaty, and wildly satisfying—this is how you win dinner.
Cheeseburger Meatloaf isn’t just a recipe—it’s an experience. With its juicy beef, gooey cheese, and tangy glaze, it’s the kind of dish that keeps you coming back for more. Whether you’re feeding a family, prepping meals for the week, or just craving something indulgent and satisfying, this recipe has you covered.
So grab your mixing bowl, fire up the oven, and get ready to enjoy one of the most flavorful meatloaves you’ll ever make. Don’t forget to share your creations—I’d love to see how you make it your own!
Happy cooking and even happier eating!