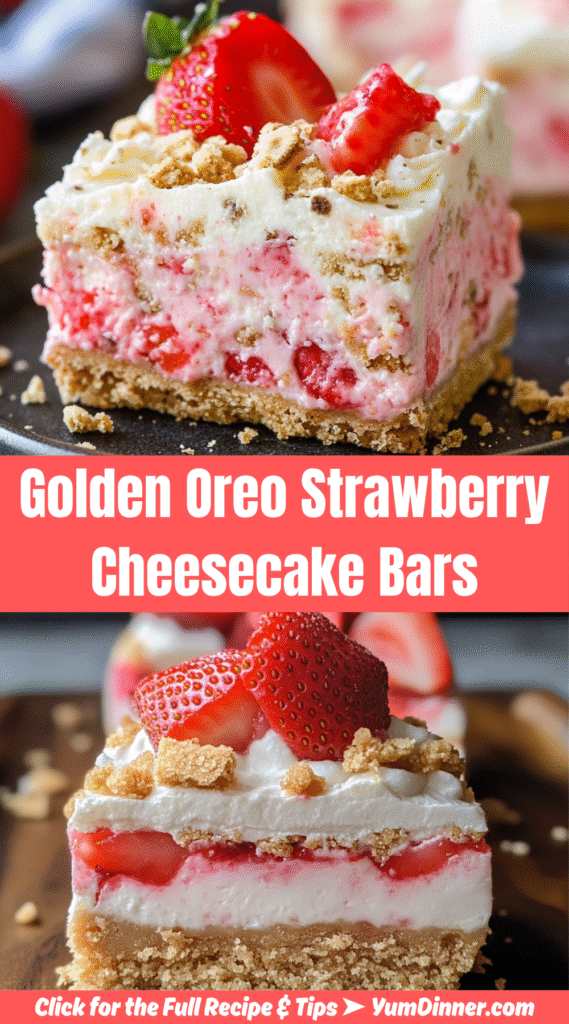
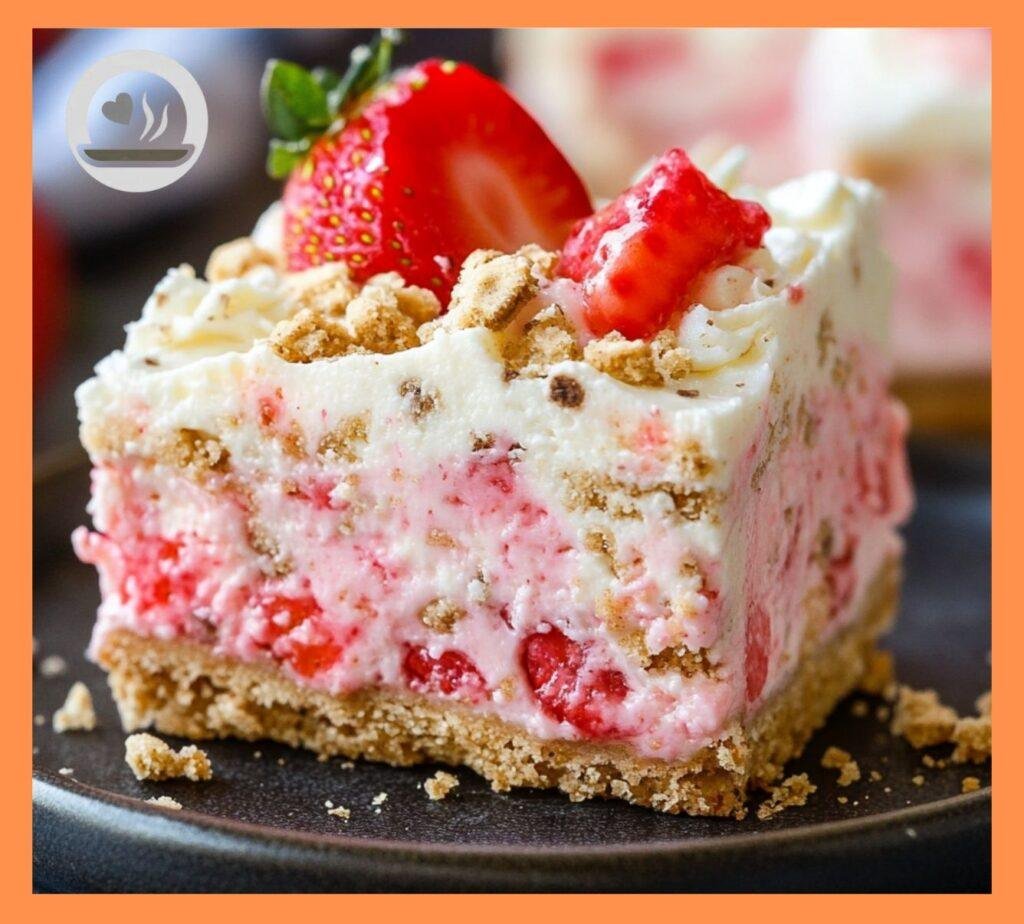
Golden Oreo Strawberry Cheesecake Bars – Perfect for Spring & Summer
You know those moments when you’re scrolling through dessert photos online and suddenly stop because something looks so ridiculously good that you literally bookmark it for later? Yeah, these Golden Oreo Strawberry Cheesecake Bars are exactly that kind of dessert. I’m talking about the holy trinity of dessert perfection – crunchy Golden Oreo crust, silky cheesecake filling, and fresh strawberry topping that makes everything pop.
I’ll be honest with you – I created these bars purely out of selfishness. My family kept requesting “something with cheesecake” and “something with Oreos” and “can we have more strawberry desserts?” So naturally, being the overachiever that I am, I decided to combine all three requests into one show-stopping dessert. The result? Pure magic that had my neighbors literally knocking on my door asking what smelled so incredible.
These aren’t your basic cheesecake bars either. We’re talking restaurant-quality dessert that looks like you hired a professional pastry chef, but honestly takes less effort than making a full cheesecake from scratch. Plus, they slice perfectly, travel well, and somehow manage to disappear faster than I can make them.
Nutrition Information
| Nutrient | Per Bar (16 servings) |
| Calories | 385 |
| Protein | 6g |
| Carbohydrates | 45g |
| Fat | 20g |
| Fiber | 1g |
| Sodium | 280mg |
| Sugar | 38g |
| Calcium | 95mg |
| Vitamin C | 15mg |
Makes 16 generous bars
Why This Combination Actually Works
Before we dive into the good stuff, let me explain why this isn’t just some random dessert mashup that sounds good in theory but fails in execution. The Golden Oreos provide the perfect sweet, vanilla-flavored base that complements rather than competes with the cheesecake. Unlike regular chocolate Oreos, the golden variety adds sweetness and crunch without overpowering the delicate cheesecake flavor.
The strawberries aren’t just thrown on top as an afterthought either. We’re making a proper strawberry compote that adds both fresh fruit flavor and gorgeous color contrast. The slight tartness cuts through all that rich cheesecake perfectly, creating a balanced dessert that doesn’t feel overly heavy.
Plus, let’s be real – these bars are way easier to serve than traditional cheesecake slices. No weird triangular pieces that fall apart when you try to plate them. Just perfect rectangular bars that stack beautifully and look professional every single time.
Ingredients
For the Golden Oreo Crust:
- 36 Golden Oreo cookies (about 1 sleeve from a family pack)
- 6 tablespoons unsalted butter, melted
- 2 tablespoons granulated sugar
- Pinch of salt
For the Cheesecake Layer:
- 24 oz cream cheese, room temperature (three 8-oz packages)
- ¾ cup granulated sugar
- 3 large eggs, room temperature
- ⅓ cup sour cream
- 2 teaspoons vanilla extract
- 1 tablespoon all-purpose flour
- ¼ teaspoon salt
For the Strawberry Topping:
- 2 cups fresh strawberries, hulled and sliced
- ⅓ cup granulated sugar
- 2 tablespoons cornstarch
- 1 tablespoon lemon juice
- 1 teaspoon vanilla extract
- Pinch of salt
For Garnish:
- 8-10 Golden Oreo cookies, roughly chopped
- Fresh strawberry slices
- Powdered sugar for dusting
Step-by-Step Instructions
Building the Perfect Crust Foundation
Step 1: Preheat your oven to 325°F and line a 9×13 inch baking pan with parchment paper, leaving some overhang for easy removal. Trust me, this step will save your sanity later when you’re trying to get these beauties out of the pan.
Step 2: Crush those Golden Oreos into fine crumbs. You can use a food processor (easiest method), or place them in a sealed plastic bag and go to town with a rolling pin. Stress relief and baking prep all in one! You want mostly fine crumbs with a few slightly larger pieces for texture.
Step 3: Mix the crushed Oreos with melted butter, sugar, and that pinch of salt until everything looks like wet sand and holds together when squeezed. The mixture should be moist enough to pack down but not soggy.
Step 4: Press the mixture firmly and evenly into your prepared pan. Use the bottom of a measuring cup or your hands to really pack it down. You want a solid, even base that won’t crumble when you cut the bars later.
Step 5: Bake the crust for 10 minutes until it’s set and lightly golden. Remove from oven and let it cool while you prepare the cheesecake layer. Don’t skip this step – a pre-baked crust prevents soggy bottoms!
Creating Cheesecake Perfection
Step 6: Make sure your cream cheese is truly at room temperature – this is crucial for smooth, lump-free cheesecake. Cold cream cheese will give you a chunky mess no matter how much you mix it. If you forgot to take it out early, you can soften it in the microwave for 15-20 seconds.
Step 7: In a large bowl, beat the cream cheese with an electric mixer until it’s completely smooth and fluffy – about 2-3 minutes. Scrape down the sides frequently because cream cheese loves to hide in corners.
Step 8: Gradually add the sugar and beat until well combined. Add the eggs one at a time, mixing well after each addition. Don’t just dump them all in at once – we want everything properly incorporated.
Step 9: Mix in the sour cream, vanilla extract, flour, and salt until just combined. Don’t overmix at this point – we want creamy cheesecake, not tough cheesecake.
Assembly and Baking Magic
Step 10: Pour the cheesecake mixture over your cooled crust and spread it evenly. Give the pan a few gentle taps on the counter to release any air bubbles – these can create cracks during baking.
Step 11: Bake for 25-30 minutes, or until the center is almost set but still slightly jiggly. The edges should be firm, but the center should have a slight wobble when you gently shake the pan. Don’t overbake – cheesecake continues cooking as it cools.
Step 12: Turn off the oven and crack the door open slightly. Let the cheesecake cool in the oven for 1 hour. This gradual cooling prevents those annoying surface cracks that make your dessert look homemade instead of bakery-perfect.
Strawberry Topping That Steals the Show
Step 13: While your cheesecake is cooling, make the strawberry topping. In a medium saucepan, combine the sliced strawberries, sugar, cornstarch, lemon juice, vanilla, and salt.
Step 14: Cook over medium heat, stirring gently, until the strawberries release their juices and the mixture thickens – about 8-10 minutes. You want it jammy but not mushy. The strawberries should still hold their shape somewhat.
Step 15: Remove from heat and let it cool completely. This topping will continue to thicken as it cools, so don’t worry if it seems a bit loose while hot.
The Final Assembly
Step 16: Once the cheesecake is completely cool (and I mean completely – we’re talking at least 4 hours or overnight), spread the strawberry topping evenly over the surface.
Step 17: Sprinkle the roughly chopped Golden Oreos over the strawberry layer for extra crunch and visual appeal. Arrange a few fresh strawberry slices on top because we eat with our eyes first, right?
Step 18: Refrigerate for at least 2 hours before cutting. Use the parchment paper overhang to lift the entire dessert out of the pan, then cut into bars with a sharp knife. Clean the knife between cuts for the cleanest edges.
Pro Tips for Cheesecake Bar Success
Temperature Control Is Everything
Room temperature ingredients are non-negotiable for smooth cheesecake. Cold cream cheese will never fully smooth out, no matter how long you beat it. Same goes for the eggs – cold eggs can cause the mixture to curdle. Plan ahead and take everything out of the fridge about 2 hours before you start baking.
The Water Bath Debate
Traditional cheesecake recipes often call for water baths to prevent cracking, but these bars don’t need that hassle. The lower temperature and gradual cooling method works just as well without the risk of getting water in your pan. Sometimes simpler really is better!
Cutting Clean Bars
For picture-perfect bars, dip your knife in warm water and wipe it clean between each cut. This prevents the cheesecake from sticking to the blade and dragging. A thin, sharp knife works better than a thick one for clean lines.
Variations That’ll Keep Things Exciting
Chocolate Lovers Version
Swap the Golden Oreos for regular chocolate Oreos in the crust, and add 2 tablespoons of cocoa powder to the cheesecake layer. The strawberries still work beautifully with chocolate – it’s like chocolate-covered strawberries in bar form.
Mixed Berry Madness
Replace the strawberry topping with a mixed berry compote using strawberries, blueberries, and raspberries. Use the same proportions and cooking method – the variety of berries creates gorgeous color and complex flavor.
Lemon Twist
Add the zest of one large lemon to the cheesecake layer and use lemon juice instead of vanilla in the strawberry topping. The citrus brightens everything up and makes it feel more summery.
Caramel Drizzle
Before adding the strawberry topping, drizzle some homemade or store-bought caramel sauce over the cheesecake layer. The combination of caramel, strawberries, and vanilla cookies is absolutely divine.
Troubleshooting Common Issues
My Cheesecake Cracked
Cracks usually happen from temperature shock or overbaking. Make sure your ingredients are at room temperature, don’t overmix, and follow the gradual cooling method. If cracks do appear, the strawberry topping will cover them up – that’s the beauty of layered desserts!
The Crust Is Too Crumbly
This happens when there’s not enough butter to bind the crumbs together. Add an extra tablespoon of melted butter if your mixture seems too dry. It should hold together when squeezed but not be greasy.
The Strawberry Topping Is Too Runny
If your topping doesn’t thicken properly, mix an additional teaspoon of cornstarch with a tablespoon of cold water and stir it into the hot mixture. Cook for another minute or two until thickened.
Bars Are Hard to Cut
Make sure the cheesecake is completely chilled before cutting – at least 4 hours or overnight. Use a sharp, thin knife and clean it between cuts. If the bars are still soft, they might need more chilling time.
Make-Ahead and Storage Tips
These bars are actually better the next day – all the flavors meld together beautifully overnight. You can make them up to 3 days ahead, just add the fresh strawberry garnish right before serving to keep it looking fresh.
Store covered in the refrigerator for up to 5 days. They don’t freeze particularly well because of the fresh strawberry topping, but the cheesecake base can be frozen for up to 2 months if you skip the fruit layer.
For parties, these bars travel beautifully. Just keep them chilled and transport in the pan – no need to pre-cut unless you want to make serving easier.
Why These Bars Work for Every Occasion
What I love most about these bars is their versatility. They’re fancy enough for dinner parties but casual enough for family barbecues. The individual bar format makes them perfect for potlucks – no need to worry about serving utensils or plates.
They also photograph beautifully, which let’s be honest, is important in our Instagram world. The layers create gorgeous cross-sections, and the colors are naturally vibrant and appealing.
The Economics of Impressive Desserts
While these bars might seem expensive to make, they actually serve a crowd for less than you’d think. Compare the cost to buying individual cheesecake slices from a bakery, and you’ll realize you’re getting bakery-quality dessert for a fraction of the price.
Plus, most of the ingredients are pantry staples – cream cheese, eggs, sugar. The Golden Oreos and strawberries are the only specialty items, and both are usually available at reasonable prices.
Perfect Timing Strategy
Here’s my game plan for stress-free entertaining: make these bars the day before your event. The flavors improve overnight, and you’ll have one less thing to worry about on party day. Just add the fresh strawberry garnish and dust with powdered sugar right before serving.
If you’re really organized, you can make the strawberry topping up to 3 days ahead and store it separately in the fridge. Just don’t add it to the cheesecake until you’re ready to serve to prevent the base from getting soggy.
Customization for Dietary Needs
While these bars are pretty indulgent as written, you can make some substitutions for dietary restrictions. Light cream cheese works fine, though the texture will be slightly less rich. Greek yogurt can replace half the sour cream for extra protein.
For gluten-sensitive folks, use gluten-free vanilla sandwich cookies instead of Golden Oreos. The flavor won’t be identical, but it’ll still be delicious.
The Science Behind the Perfect Bar
Ever wonder why some cheesecake bars turn out perfectly while others are disasters? It all comes down to understanding the science. The flour in the cheesecake layer helps stabilize it and prevents cracking. The gradual cooling process prevents thermal shock that causes cracks.
The cornstarch in the strawberry topping creates the perfect consistency – thick enough to stay put but not so thick that it’s gummy. And pre-baking the crust ensures it stays crispy even under all that creamy cheesecake.
Final Thoughts: Triple Threat Success
Look, I could give you a dozen complicated dessert recipes that require professional equipment and pastry school techniques, but sometimes you want maximum impact with reasonable effort. These Golden Oreo Strawberry Cheesecake Bars deliver exactly that – they look and taste like something from a high-end bakery but come together with ingredients you can find at any grocery store.
The combination of textures and flavors creates something truly special. You get the crunch from the Oreo crust, the creamy richness of perfect cheesecake, and the fresh brightness of strawberries all in one perfect bite. It’s comfort food elevated, and honestly, isn’t that what the best desserts should be?
Whether you’re trying to impress dinner guests, need something spectacular for a potluck, or just want to treat your family to something amazing, this recipe delivers. Plus, you’ll have people convinced you’re some kind of dessert genius – and really, who doesn’t want that reputation?
So grab those Golden Oreos, get your cream cheese to room temperature, and prepare to create some seriously impressive magic. Your kitchen is about to become the most popular room in the house! IMO, that’s exactly where it should be. 🙂